media junction® and Remotish have merged

You’ve built a robust website with plenty of appropriate lead-capture areas. Tons of time has been spent by the marketing and sales teams to drive folks to some specific, bottom-of-the-funnel pages that have forms on them.
Then it happens - a qualified, sales-ready lead submits a form. It’s a great day!
But what do you do now?
You know from best practices that the clock is ticking and the faster you can get the appropriate salesperson to follow up with that lead the more likely they will be to continue their buyer’s journey with your company.
And if you don’t get that lead in front of the right person quickly for follow-up then your competitor might.
This is where lead routing - and particularly automated lead routing - comes in.
Lead routing can help ensure that when leads come in they are brought to the attention of the right person or people quickly so that they can rapidly take the appropriate next step with the lead based on available information.
We’ve helped plenty of clients establish, document, execute, automate, and optimize their lead routing efforts so in this article you’ll learn some readily available guidance and best practices that we had to learn the hard way.
In this article, we’ll cover what lead routing is, how to identify and document your internal lead routing process, and how to set the foundation for your automated lead routing process and bring it to life in HubSpot. Let's get started.
What is lead routing?
Lead routing is a set of criteria or rules that determines when and to which team member(s) a lead should be assigned.
A company may have different lead-routing processes or criteria for marketing, sales, and even service.
- For marketing, lead routing may be placing a lead that isn’t sales-ready into a nurture automation or workflow.
- For sales, lead routing may be setting the ownership of a sales-ready lead to a specific salesperson if they’re located in a certain territory or industry and tasking that salesperson for follow-up.
- For service, lead routing may be a ticket being assigned to a technical resource based on their availability or the tier of the support request.
Identifying and documenting your internal processes
Now that we’ve defined lead routing the next step is to identify your existing internal lead routing processes.
Your current processes will likely be informed by what your team is doing today and the maturity of what that looks like.
There are no wrong answers here and the current maturity of your process should only serve as a benchmark for you to build and optimize from.
Identifying the ways you get your leads
The first step to building a foundational, automated, lead routing process is to get a clear picture of where and how your leads are coming to your company.
This is relevant because the method a lead comes to your company may inform how that lead gets routed.
You may have a partial picture or some notions in your mind of all the different ways that leads flow into your company. This effort is specifically to document all those different streams flowing into your mighty river of lead generation as well as provide some context for each.
The form this effort takes will depend on how much of this work you’ve already completed but at minimum, you should have:
- A document or spreadsheet that lists out all of the high-level ways that your company generates leads
- Here are some examples to give an idea of the granularity that you’re looking for:
- Organic website traffic
- Paid website traffic
- Sales prospecting/outreach
- Trade shows
- Networking events
- Print/radio/TV advertising
- Hosted marketing events
- Referrals
- Organic social media
- Paid social media
- Paid lead acquisition
- Content syndication
- Industry or regional group membership
- Here are some examples to give an idea of the granularity that you’re looking for:
- Within that document, add a least a sentence or two for context for each of the sources for your leads
- Here are some examples to give you an idea:
- Organic website traffic
-
“Leads that come to us from submitting a form on our website due to our SEO efforts.”
-
- Paid website traffic
-
“Leads that come from paid traffic sources such as paid search.”
-
- Sales prospecting/outreach
-
“Leads that come from the sales team’s prospecting and outreach efforts through email, phone, and LinkedIn.”
-
- Organic website traffic
- Here are some examples to give you an idea:
To get the above information you may need to gather it from a few different teams but having it all documented in one place will be worth the effort.
While compiling this documentation, avoid adding “offline” sources to your lead source documentation. It’s fairly common to have offline lead sources but go another layer deeper. More specifically, what are those offline sources?
Are they list uploads courtesy of your membership in a local chamber of commerce?
Are they leads that are manually entered into your CRM from folks calling into your company?
Though these could both be considered “offline” sources, digging that additional layer down helps to break it up into more distinctive groups without being too detailed.
Additionally, also steer clear of “other” as a source in your documentation. Though it can be tempting to put a catch-all-else “other” bucket in your documentation, it would run against the purpose of this exercise.
You want a full understanding here of where your leads are coming from to factor that into how to properly route those leads later on in this process.
If there are truly fringe cases that you identify that don’t fit into an existing source category, consider including an “other” source with more context to account for the specifics of those fringe cases.
When completed, ensure that this document is shared with the appropriate folks so everyone has access to the same information, and keep the document regularly updated based on lead sources that may be added down the road.
Defining your lifecycle stages
The next step to setting up your automated lead routing is to define and document the lifecycle stages that your prospects go through when interacting with your company.
Much like defining your internal processes, this is a foundational element that will enable your automated lead routing overall. Without it, you will be without some of the information needed to program the automation piece of your automated lead routing.
Similar to defining and documenting your internal processes, you may have guidelines internally related to these stages already.
Regardless of the maturity of your definition and documentation of your prospect’s lifecycle stages, you’ll at a minimum want to ensure before leaving this step that you have:
- Each of your lifecycle stages defined
- Entrance criteria defined and documented for each stage
- Entrance criteria are the behaviors and/or demographic information that make a contact or prospect eligible to enter into a stage.
- Exit criteria defined and documented for each stage
- Exit criteria are the behaviors and/or demographic information that make a contact or prospect eligible to leave the stage and move to the next stage.
- Documented the team(s) primarily responsible for prospects at each stage as well as who owns the advancement of prospects to their next stage.
- Bonus points: document the general tactics or content that you typically use for prospects in each of your stages.
- Bonus points: map your lifecycle stages to your CRM.
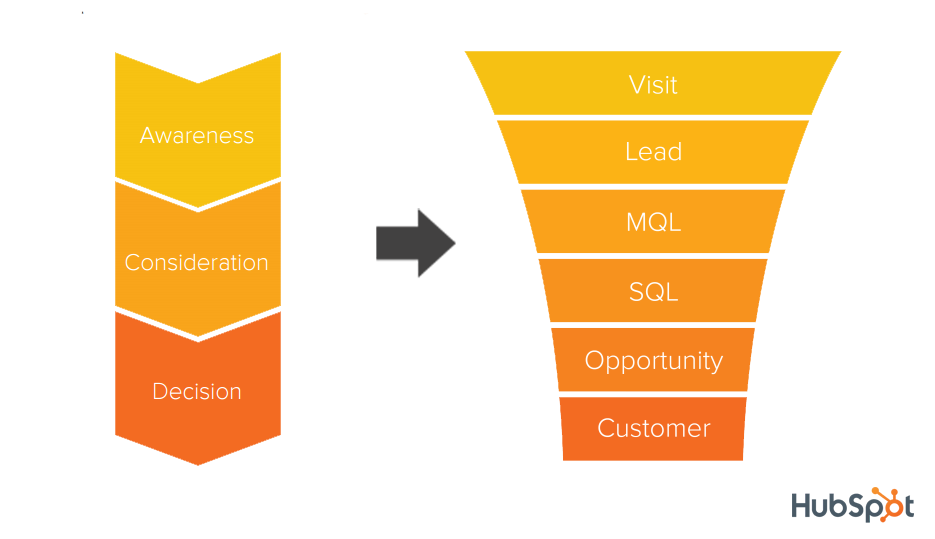
If you’re using HubSpot you’ll have the default lifecycle stages of:
- Subscriber
- Lead
- Marketing Qualified Lead (MQL)
- Sales Qualified Lead (SQL)
- Opportunity
- Customer
- Evangelist
- Other
If these lifecycle stages seem close but not quite close enough in HubSpot, you can create and customize lifecycle stages in HubSpot to better align with your internal definitions and stages.
Determining when a lead is assigned to marketing
Next, you’ll want to discuss, determine, and document when a lead is assigned to your marketing department.
Use the information you documented earlier related to the way you get leads and your lifecycle stages to define and document when or under what circumstances a lead would be assigned to your marketing team.
This may be determined by:
- Lead source
- Lifecycle stage
- If an inbound lead, the type of content they downloaded
- If from a form completion, the form or type of form they completed
- If the lead is associated with an existing, owned company
- If the lead has had previous engagements with your company
…and other factors.
Some common lead assignment scenarios we’ve seen for routing to the marketing team include:
- All lifecycle stages below Sales Qualified Lead are assigned to marketing for further nurturing and qualification until they are SQL-ready to be passed to the sales team.
- Leads are assigned to marketing for further nurturing or qualification based on the lead source they came in from as well as the content or form they converted on (if applicable).
Typically in those common scenarios above, if a new lead is already associated with an existing company that is being worked by the sales or service team, the lead adopts the same status as the company they’re associated with.
However, if you’re the type of company that may work several different departments or divisions within larger companies, you may want to consider treating leads separately for lead assignment than the company that they’re associated with.
Documenting your lead hand-off between marketing and sales
Just as important as documenting when a lead is assigned to a team or a person is defining and documenting what the hand-off of a lead between teams looks like.
As part of this documentation, you should at a minimum consider defining:
- When a lead, contact, or customer moves between teams (for example, from marketing to sales or sales to service)
- What information should be provided by the person or team handing off the lead or customer to the next team
- What the expectations are for the team or person receiving the lead that was handed off (for example, that the new team or person will contact that lead within a certain amount of time or follow up a certain number of times in a given period)
If you don’t have formal internal processes yet for this you can base it on the latest best practices.
For example, when it comes to follow-up on a sales qualified lead that has submitted a form, data shows that salespeople who follow up with that lead within 1 hour of their submission are almost 7 times more likely to have a meaningful discussion with that lead than those that take longer to follow-up.
Additionally, an industry study conducted on sales follow-ups showed that 80% of sales require an average of five follow-ups to get a “yes” from a prospect.
As you begin to put your handoff and follow-up processes into action, you can continue to refine them until you reach a point of wanting to formalize them with a service level agreement (SLA).
An SLA is essentially documentation of all we mentioned above for those expectations on all teams involved with a lead handoff in different scenarios but in a more formal manner.
Typically this is a document that is reviewed by all teams and team members involved, that has specific criteria laid out, and is signed off on by all teams and team members that will be responsible for executing the elements of the SLA.
Determining when a lead is assigned to sales and to which salesperson
After you’ve documented your marketing lead assignment conditions or scenarios, you’ll want to move on to your sales team next.
At first, this exercise will be similar to the one you did for the marketing team assignments. You’ll utilize the previous information you’ve discussed and documented to determine when a lead will be assigned to the sales team.
Take into consideration the same things you did when you performed this exercise for the marketing department and document the decisions that your team(s) came to.
Some common lead assignment scenarios we’ve seen for routing to the sales team include:
- When a lead advances to the Sales Qualified Lead stage.
- When a lead comes in through a Contact Us form and can be immediately qualified.
- When a lead engages with sales outreach in a positive way.
- When a lead comes in through a phone conversation.
However, there is an extra layer when you’re routing sales leads that needs to be considered.
Whereas with the marketing team, all leads are typically worked by the marketing team as a whole, when a lead is routed to the sales team it typically needs to be owned by a specific salesperson.
There are many different ways to determine which salesperson gets which leads but we’ve detailed some common scenarios that we’ve seen below.
By industry
One common way sales-qualified leads are routed to a salesperson is by industry assignment.
If your company already assigns contacts, leads, or companies based on industry or vertical, this may be the best route for you.
For example, perhaps you have a salesperson who focuses on the information technology (IT) industry or vertical while another salesperson focuses on healthcare.
Check out this walkthrough video below for more examples, information, and step-by-step guidance on how to set up foundational industry-based lead routing in HubSpot.
By region or territory
Another common scenario is that sales-qualified leads are routed to a salesperson by region or territory.
If you currently have your sales team focusing on leads or companies by region, this will likely be the best route for you.
Your region or territory will look different depending on the way your company breaks up regions and territories.
It may look like specific:
- Cities/towns
- Counties
- States
- Countries
…or something similar.
The video below walks through more examples, information, and a step-by-step on how to set up foundational region-based lead routing in HubSpot.
By company size, employee count, or annual revenue
If you currently base your sales team assignments on a company’s size, employee count, or annual revenue, this option may be the best for you.
Many business-to-business (B2B) companies have designations for small and medium-sized businesses (SMB), mid-market (MM), and enterprise-size companies.
Sometimes this is determined by employee count, company size, or annual revenue. Sometimes it’s a combination of employee count and annual revenue that determines these designations.
A small difference here also is that sometimes companies will have sales teams that specifically focus on the SMB, MM, and enterprise spaces.
Suppose that’s the case for your company. In that case, you’ll want to identify a second-level down lead routing criteria (such as company size and industry) or take a round-robin approach to lead assignments within the team.
A round-robin approach is when you assign a lead to the members of a team based on a rotational order or based on availability.
By offering/solution/product line
The last common scenario we typically see is salesperson assignments based on offerings, solutions, or product lines within the company.
For example, if your company currently assigns different salespeople or sales teams to cover your different product categories, solutions, or offerings then this path may be right for you.
If you already have this as an internal process, you likely have either teams or individuals assigned to your different business lines as well as ways of identifying the product, solution, or offering that your leads are interested in and can account for that in your lead routing.
Setting the foundation for your automated lead routing in HubSpot
You’ve identified the way your leads come in, you’ve defined your lifecycle stages, you’ve documented your processes, and now you’re ready to map this information into HubSpot.
Some of this may already be accounted for in your HubSpot portal, particularly lifecycle stages, but now is a good time to ensure that HubSpot matches what you’ve documented.
Map your processes into HubSpot
The processes you documented will provide the core information and guidance on where or with what tools in HubSpot will best help translate your internal processes into the system.
For example, at this stage, you’ll want to identify the key properties in HubSpot that correspond to data or conditions you’ve documented.
Your lifecycle stage definitions are likely the most straightforward and can be mapped to Lifecycle Stages in HubSpot. You may need to customize your lifecycle stages in HubSpot to match the ones you’ve identified. Fortunately, HubSpot supports that level of customization.
Other properties and processes will be mapped to other tools or areas within your HubSpot portal. Some of these may be more obvious than others.
For example, based on the examples above, you may be using industry, number of employees, and/or annual revenue as part of your criteria for lead routing in HubSpot.
However, you’ll want to consider if you’ll be using those properties from the Contact record or a Company record.
These properties exist for both Contacts and Companies by default in HubSpot so you’ll want to examine which properties seem to be used most, the most up-to-date, or may be connected to critical integrated systems.
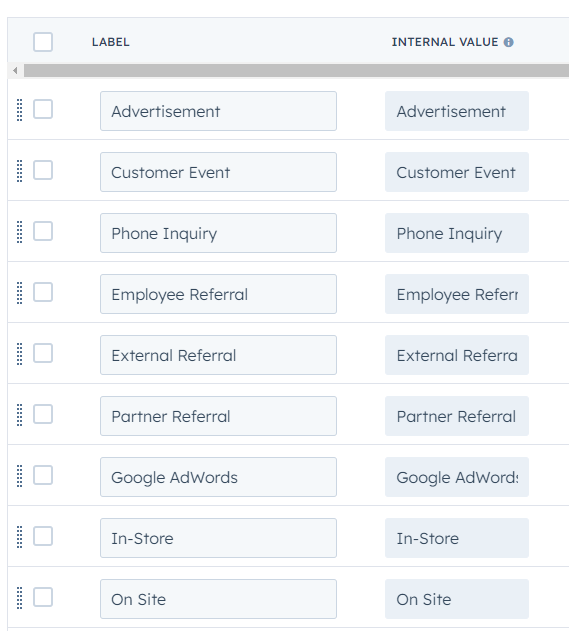
Below are HubSpot properties that may be relevant to your lead routing considerations. This list is not exhaustive, only includes HubSpot default properties, and is to spark ideas rather than be a checklist:
- Annual revenue
- Buying Role
- City
- Company Owner
- Company Size
- Contact Owner
- Country
- First Conversion
- HubSpot/Lead Score
- Industry
- Job Title
- Last Activity Date
- Latest Source
- Lead Status
- Lifecycle Stage
- Number of Associated Deals
- Original Source
- State/Region
- Time Last Seen
You may even find a need to create custom properties to house the data you need to enable your automated lead routing.
If that’s the case, we recommend reviewing existing HubSpot properties first to ensure that there isn’t a property that already exists that could serve your use case. We’ve seen our fair share of custom property sprawl in HubSpot portals and it can have other drawbacks as well.
Building automated lead routing in HubSpot tools
Here’s where the rubber hits the road. You’ve got everything you need identified, and documented, and your properties are mapped with HubSpot. You’re ready to start setting up automated lead routing in the different tools throughout HubSpot.
Given the potential within HubSpot as a platform/system/tool, there are all sorts of varied ways and approaches you could look to build out automated lead routing within HubSpot depending on your Hubs and service levels.
Below are some fundamental automated lead routing use cases to get you started.
With your documentation in hand and the experience of setting up these fundamental automated lead routing use cases (if they apply to your company), you may be inspired to continue setting up lead routing-related automation for other areas of your business.
Automated lead routing with forms
This first HubSpot tool we’ll cover is Forms since a sizable portion of your leads may come in through a form or at least it will likely be the first conversion that a prospect has with your company if you’re using HubSpot.
Forms also have a lot of built-in features that allow you to gather and set information that will further help your lead routing automation efforts.
For example, in the Options tab of forms, you can set the lifecycle stage of a Contact that submits the form and set follow-up notifications to both a Contact’s owner in HubSpot as well as any other designated HubSpot users.
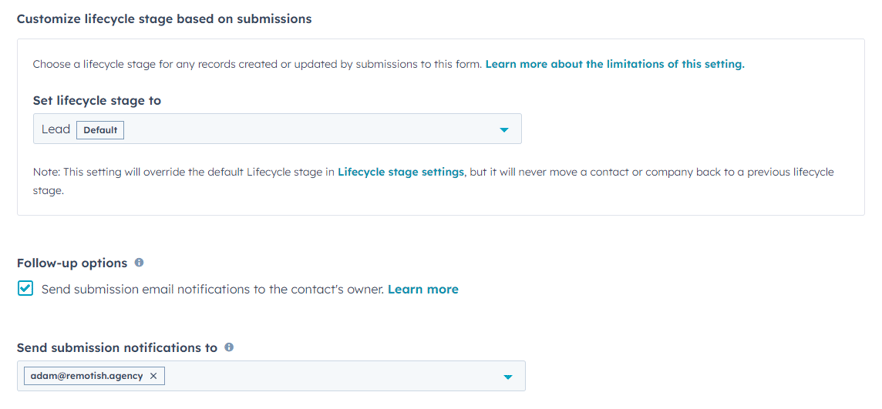
You can also get creative with hidden fields in the form itself to set selected property values based on what you know about or can comfortably assume about the Contacts that may complete the form.
Additionally, simple automations can be built within the form tool itself under the “Automation” tab.
We wouldn’t recommend trying to build any more complex workflows like the sales lead routing workflows we’ll be discussing in a few sections here.
But you can create a simple workflow to do things like enroll the contact into a list for use in other automation (like enrolling in a nurturing workflow), rotate the record owner, create a task, and add them to an ads audience.
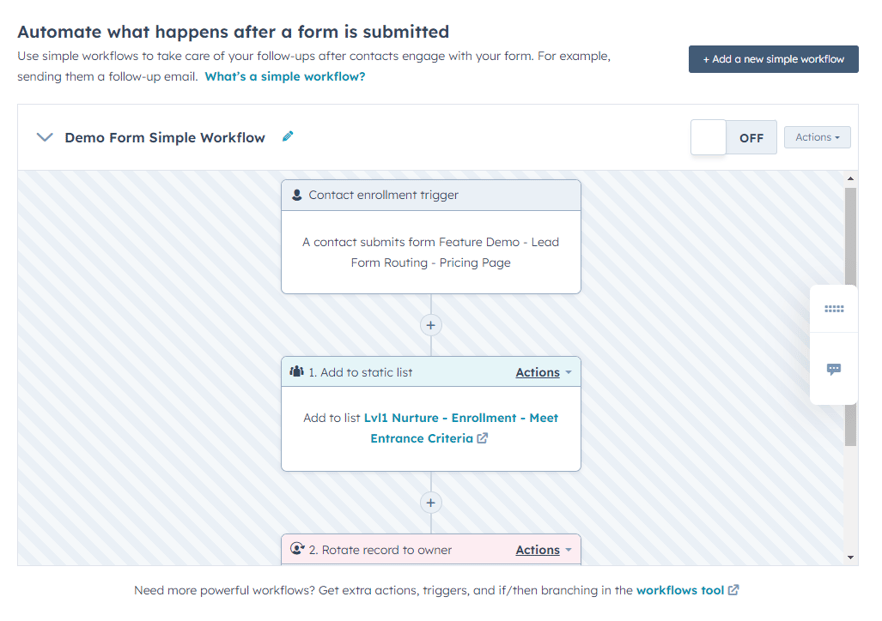
The above areas of the forms tool will likely cover many of the use cases for marketing but there are a ton of possibilities even within those features.
Lead form routing for sales
Within the Options tab of a form, you can choose what should happen when someone submits the form. One of the options you have available is to redirect the Contact to a Meetings scheduling page with a feature called lead form routing.
If your salespeople or sales teams use HubSpot Meeting links then instead of directing the person submitting the form to another page or displaying a thank you message you can send them to the appropriate salesperson’s meeting link by setting up some automated routing conditions.
You can set redirecting conditions with “if” statements based on the properties (and the data within them) for any of the properties/fields that you have in your form.
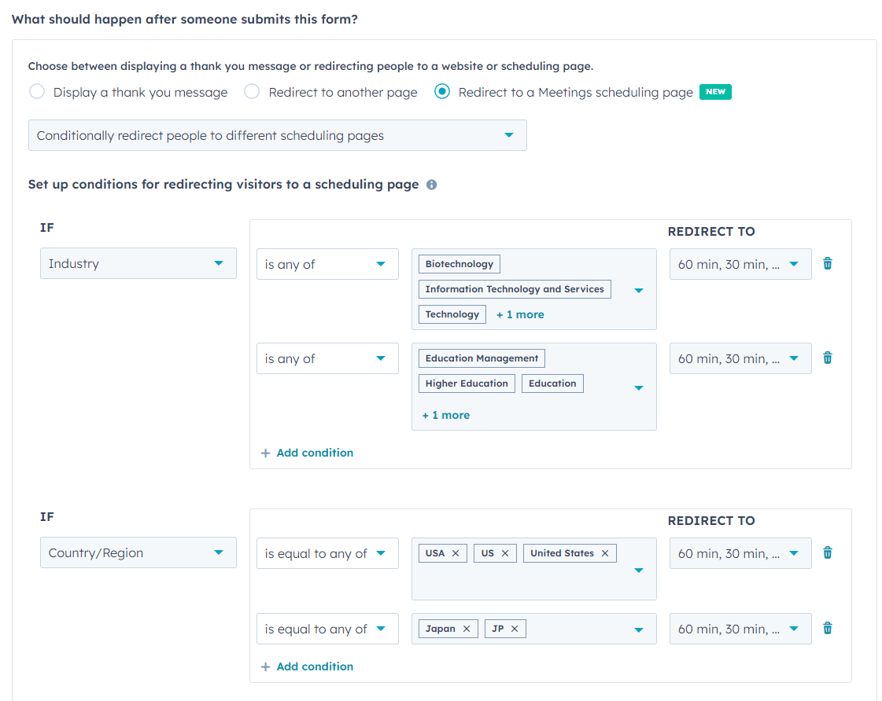
For example, if you want to base your lead form routing criteria on industry, you’d have to include one of the industry properties on your form. You can then specify that if “industry is any of higher education or education” for example a person submitting the form should go to salesperson 1’s Meeting link.
Whereas if their industry is technology or biotechnology then they should go to salesperson 2’s Meeting link.
Watch the short video below for a walkthrough and an example of the lead form routing feature.
Automated sales lead routing by industry
If you assign leads to your sales team and your salespeople based on industry or vertical focuses, then building automation to route leads to them appropriately could be a huge time saver.
Additionally, setting up automatic lead routing for your sales team in this way can decrease time spent on administrative tasks and get your team back to efforts that drive revenue more directly.
The first step in building this foundational automated sales lead routing by industry is to create data reference lists for each of your salespeople.
A data reference list is an active list in HubSpot that allows you to use the same filter or list criteria in multiple places by using the list as the criteria rather than having to rebuild and potentially edit the same criteria in many tools or areas.
Watch the short video below for more information and use cases on how to create data reference lists and some areas of HubSpot where you can apply them.
For example, if you have a salesperson who focuses on the technology, nanotechnology, and electronics industries, you’d want to start by creating an active list in HubSpot with all of the applicable industry options for them.
Those list filter criteria may look something like “Contact is associated to any Company and associated Company has all of industry is any of technology, nanotechnology, and electronics.”

Once you’ve built data reference lists for all of your salespeople and their respective industry or vertical coverages you can start to build your lead routing workflow.
Start by creating a new workflow with a Contact enrollment trigger of “Contact Owner is Unknown”.
If this applies to your business and processes, next you’ll want to build an if/then branch to check if the Contact is associated with a Company that already has an owner. If so, you can copy the Company Owner to also be the Contact Owner.
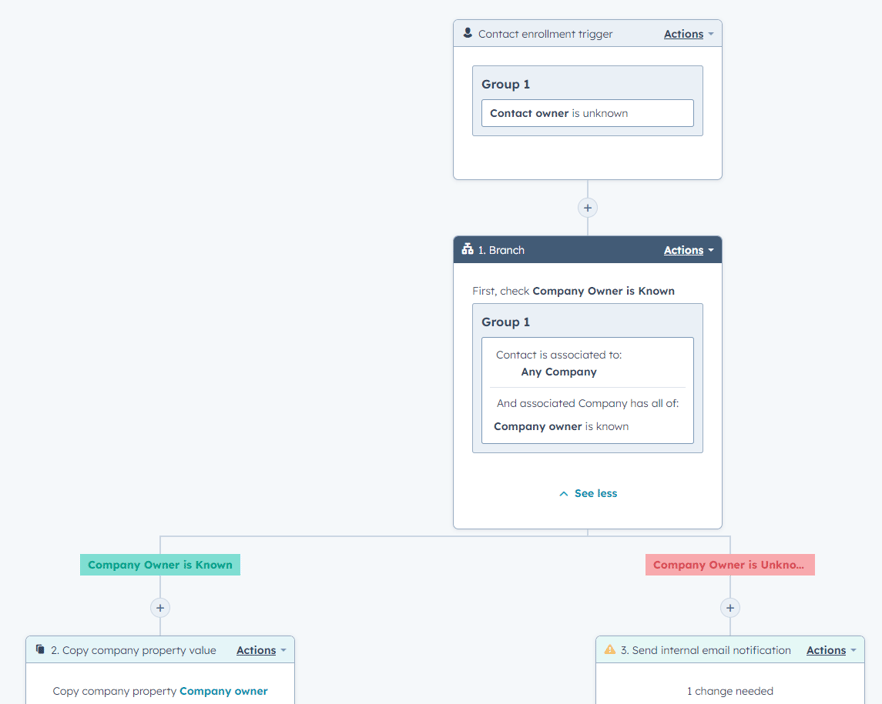
If the Company record also doesn’t have an owner, we recommend adding an action to send an internal notification to a sales manager or someone similar who can review the record and assign the appropriate Company owner to the record.
Then, make another if/then branch to create individual branches for each of your salespeople. This is where you’ll utilize the data reference lists that you made earlier that account for the industry or verticals that each of your salespeople covers.
You’ll use the criteria of “List membership is a member of” and include each list that applies to an individual salesperson for each group of the branch.
In each of your salesperson branches, you’ll at least want to ensure that the Contact record owner is set to that respective salesperson.
We also recommend adding additional actions for things like sending an internal email notification or a Slack message to notify the salesperson that they have a new lead assigned to them as well as creating a task for the salesperson to follow up with that new lead.
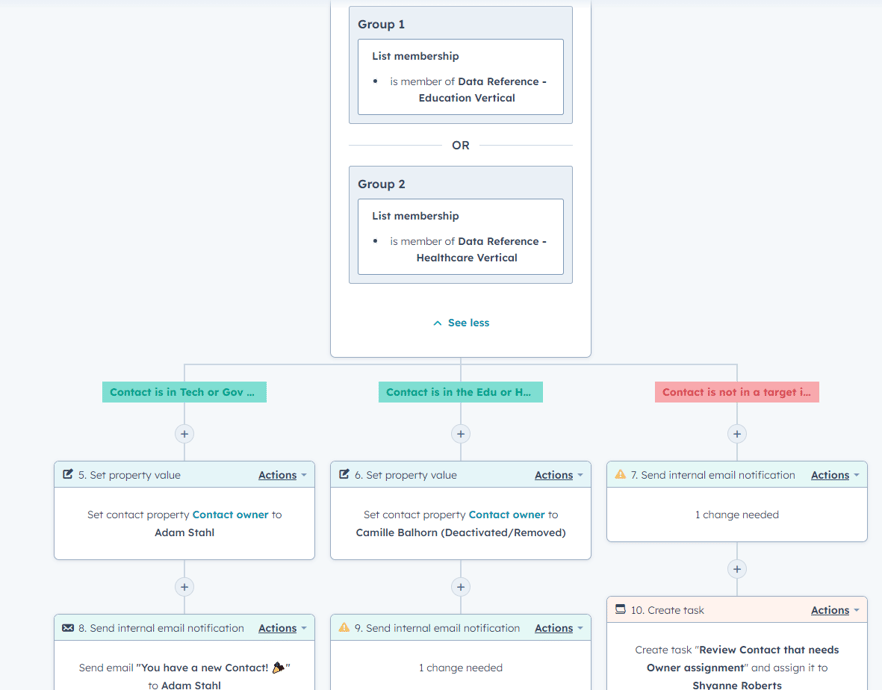
Next, make sure to have a branch that has actions for if a Contact doesn’t belong to one of the industries specifically covered by your sales team.
You can either assign these leads to one designated salesperson or instead have actions to send an internal notification to a sales manager or similar employee who can review the Contact records that don’t meet your industry criteria and assign them as desired.
Finally, make sure to test your workflow before turning it on, and be mindful of whether you choose to enroll all Contacts that currently meet enrollment criteria or whether to only enroll them moving forward.
There are other actions and considerations that you can account for in a workflow like this but the above covers the fundamental elements to get your automated lead routing for sales flowing based on industry designations.
Watch a full step-by-step walkthrough for building this type of lead routing automation in the video below.
Automated sales lead routing by region or territory
Similar to the automated sales lead routing by industry above, if you instead base your sales lead assignment on regions or territories then you’ll want to follow many of the steps above with some small differences.
First, you’ll want to build data reference lists for each region or territory that you cover.
This is an active list in HubSpot that will allow you to build out this lengthy criteria (such as all the cities, counties, states, and/or countries that each salesperson covers) in a single location.
You’re then able to use membership in these lists as filter criteria in other HubSpot tools such as workflows, reports, lead scoring, and other lists to save time in the long run.
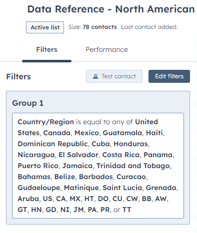
For example, if you have a salesperson that covers a North American territory, you would likely want to add list criteria for “country/region is equal to any of United States, US, Canada, CA, Mexico, MX…” et al. for all the countries and their abbreviations that salesperson covers.
Once you’ve built all the data reference lists you need to cover your regions/territories, then you can begin similarly building your workflow as the lead routing automation by industry above:
- Create a new workflow with a Contact enrollment trigger of “Contact Owner is Unknown”
- If it applies to your business, create an if/then branch to check if the Contact is associated with a Company that already has an owner
- If so, you can copy the Company Owner value to the Contact Owner property
- If the Company record also doesn’t have an owner, add an action to send a notification to a sales manager or someone similar who can review and assign the appropriate Company Owner
- Make another if/then branch to create individual branches for each of your salespeople using their respective region/territory list(s) as the group criteria
- In each salesperson’s branch, include actions to:
- Set the Contact Owner of the Contact record to that salesperson
- Notify the salesperson of a new lead assigned to them
- Create a task for the salesperson to follow up with their new lead
- Include a branch that has actions for if a Contact belongs to an area not covered by your sales team
- Include actions to either:
- Assign these leads to one designated salesperson
- Or instead have actions to send a notification to a sales manager or similar employee who can review the Contact records and assign them as desired
- Include actions to either:
- In each salesperson’s branch, include actions to:
- Test your workflow and be mindful of your settings when publishing whether to enroll all Contacts that currently meet the workflow criteria or only enroll Contacts moving forward
A complete step-by-step walkthrough video of the above process can be found in the video below.
Congratulations, you’ve got more time back in your day with automation
Automated lead routing can save you a ton of time on administrative tasks in HubSpot. It can get more time back into your day, improve your lead response or follow-up time, increase conversion rates, increase deal creation rate, and potentially even increase revenue.
By documenting your processes, mapping them to HubSpot, and building automation around those processes, you’ve taken a huge step in establishing some revenue operations (RevOps) foundational elements.
Lead routing automation is a great step but don’t stop here. Keep flushing out and documenting your marketing, sales, service, and operations processes.
Continue to map those processes to HubSpot and look for areas of optimization like automated processes, introducing strategic personalization, standing up infrastructure based on best practices, and reporting on your efforts to show your improvement as well as return on investment (ROI).
If you’re not sure what foundational aspects of HubSpot or RevOps you should focus on next, consider working with a HubSpot Solutions Partner like Remotish.
We help companies like yours develop foundational HubSpot RevOps strategies focused on the fundamentals and optimizations across all Hubs through onboarding, road mapping, and managed services.
Book a chat with us today to explore what areas of your RevOps or HubSpot efforts could be optimized to maximize your ROI.